Opening OBS Studio for the first time can spark a unique mix of excitement and anxiety.
You’re confronted with a black screen, a jumble of menus, and a settings panel that feels more like a pilot’s cockpit than a streaming tool. You’re passionate about your content – whether it’s gaming, art, or just chatting. However, transforming that passion into a polished stream can seem like a daunting leap from the thought of “I want to stream” to “I am live with top-notch audio and video.”
Creating an exceptional stream takes more than a single click. As we move into 2026, production quality expectations have skyrocketed. Audiences are after more than just a video feed and today they’re looking for a full experience. Whether you’re hitting the new 1440p thresholds or perfecting a sharp 1080p stream, your settings are your launching pad.
Here’s your step-by-step breakdown for setting up OBS Studio in 2026.
Phase 1: The Foundation (Video Settings)
Before diving into bitrates, we need to define the size of your canvas.
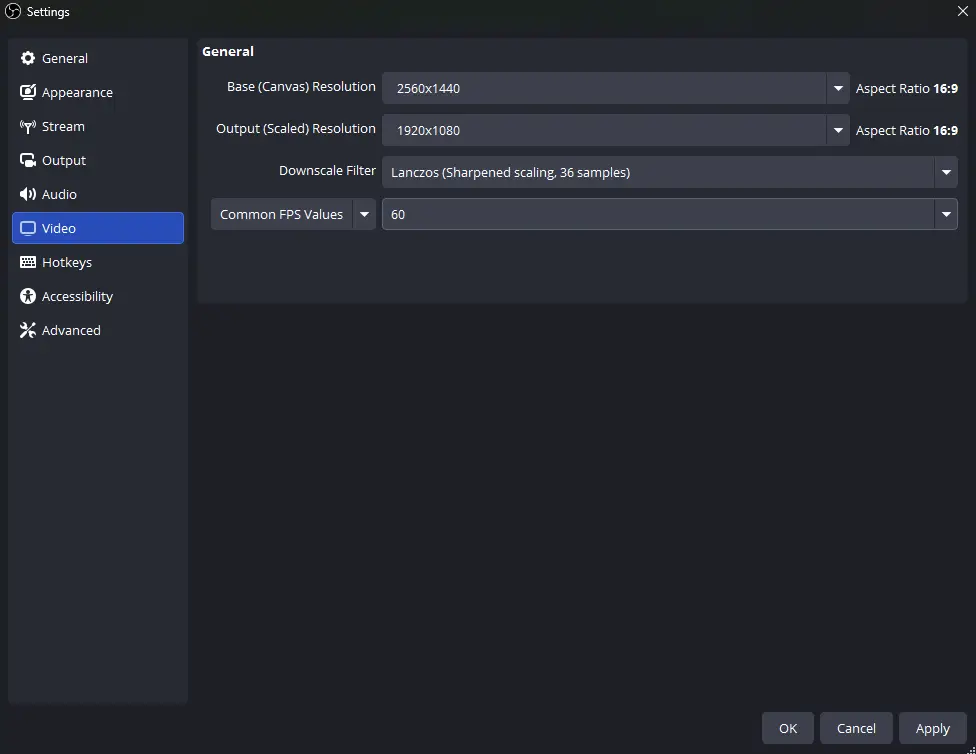
- Open Settings (located at the bottom right) and navigate to the Video tab.
- Base (Canvas) Resolution: Set this to your monitor’s resolution—typically 1920×1080 or 2560×1440. This is what you see.
- Output (Scaled) Resolution: This is what Twitch will display.
– The 2026 Standard: 1920×1080.
– The Performance Saver: 1704×960 (This resolution looks sharper than 720p but requires less bitrate than 1080p). - Downscale Filter: Choose Lanczos (Sharpened scaling, 36 samples) for the best image clarity.
- Common FPS Values: Aim for 60 FPS. While exceptions exist for “Just Chatting” streams or retro turn-based games, 60 FPS is generally the expectation.
Phase 2: The Engine (Output Settings)
Many tutorials steer you toward the “Simple” mode, but we’re going to take the correct route.
- Go to the Output tab and switch Output Mode to Advanced.
- Streaming Settings:
- Audio Track: 1
- Twitch VOD Track (Essential for 2026): Check this option and select Track 2. This allows you to stream with music on Track 1 while keeping it out of your VODs on Track 2, minimizing DMCA risks.
- Encoder:
- For NVIDIA GPU users: NVIDIA NVENC H.264 (The gold standard).
- For AMD GPU users: AMD HW H.264.
- For users with a powerful CPU or dedicated PC: Use x264 (if you don’t have a modern GPU).
- Rate Control: Opt for CBR (Constant Bitrate). Twitch hates variable bitrates.
- Keyframe Interval: 2s. (Strict Twitch requirement. Do not change this).
- Preset: P6: Slower (Better Quality). If your PC struggles, drop to P5.
- Tuning: High Quality.
- Multipass Mode: Two Passes (Quarter Resolution).

Phase 3: Audio That Doesn’t Hurt Ears
- Go to Settings > Audio.
- Sample Rate: 48 kHz.
- Desktop Audio: Select your headphones/speakers.
- Mic/Auxiliary Audio: Select your microphone interface.
The Secret Weapon: Filters. Right-click your Mic in the Audio Mixer > Filters. Add these three in order:
- Noise Suppression: (Method: RNNoise) – Kills keyboard clacks and fan hum.
- Compressor: – Balances your whispers and screams so you don’t blow out eardrums.
- Limiter: – Set to -3.00 dB. This is your safety net to prevent distortion.
Phase 4: The Aesthetics (Where We Come In)
Now that your stream works, it needs to look like you.
A naked OBS feed is functional, but it doesn’t build a brand. You need:
- Scenes: A “Starting Soon,” “Just Chatting,” “Gameplay,” and “BRB” scene.
- Sources: Your Game Capture, your Camera, and your Overlays.
This is where StreamingVault steps in. We don’t believe in generic templates. Your overlay package – your alerts, your webcam border, your stinger transitions – communicates the quality of your content before you even speak a word.
To add them:
- Create a Scene (bottom left).
- Click the + in Sources.
- Select Media Source for animated overlays (WebM files are best for performance) or Image for static designs.
- Or check out our full guide on how to set up or designs
If you are ready to swap that default look for a premium, cohesive design that tells your story, browse the StreamingVault collections today. We have a variety of different overlay packs for every type of streamer! And with the code “SETUP” you can get a 20% discount!
Stay live.